Install Home Assistant Community Store {HACS}!
Learn how to install and configure the Home Assistant Community Store (HACS) to unlock powerful custom add-ons for your smart home setup. This step-by-step guide covers installation via SSH, Docker, and VM, helping you enhance your Home Assistant experience.
The Home Assistant community store is an add-on for Home Assistant. It allows you to quickly and simply integrate community-produced add-ons and custom elements. In this blog post, I'll show you how to set up HACS for your instance and use it via the UI, or user interface.
Requirements
The minimum requirements for this integration are a free GitHub account and the ability to SSH into your Home Assistant instance, unless you are running HA in a container or VM. If the latter is the case, you can access the same "terminal" via the VM or Docker exec consoles.
SSH Install
Because they feature the Supervisor menu and Add-On store, SSH is only required for Home Assistant OS or Home Assistant Supervised installations, but don't worry, I'll guide you how to install it for your Docker instance as well.
First, make sure your user is in advanced mode. Simply click on your Home Assistant username in the lower left corner and scroll down the list to ensure advanced mode is selected; otherwise, when we try to install Terminal & SSH, the integration will not be visible.
Now, navigate to Settings > Add-ons> Add-On Store > type ssh > select "Terminal & SSH" from the Official Add-ons section > and click Install.
After installing the SSH integration, select Start, then the OPEN WEB UI button to enter the console, and finally, paste the following command and hit Enter.
wget -q -O - https://install.hacs.xyz | bash -This is the HACS install script that we need to run in order for the integration to appear in Home Assistant.
When you notice the message "INFO: Installation Complete" in the terminal, you can proceed to HACS Integration. In the following section I will show you how to install this in a VM or Docker console.
VM or Docker SSH Install
You can now use the docker exec command or load a bash shell in portainer, depending on how you're running your container in Docker. The docker exec command is as follows:
docker exec -it homeassistant bashAfter the -it flag, the homeassistant will be whatever you named your container, and we'll be kind of SSH'ing into it. The other approach is to use Portainer, which allows you to just click on the container, then the terminal icon, and finally the bash shell. Now that we're in our container, we can use the same SSH Install script to install HACS:
wget -q -O - https://install.hacs.xyz | bash -You can proceed once you see the message "INFO: Installation Complete" in the console.
HACS Integration
The instructions will be the same whether you are running Home Assistant OS, Supervised, or Container. So, we'll add the integration to our instance, and as stated in the console after running the script, the first thing we need to do is restart our instance. To do so, go to settings and then click on system. There are three dots in the top right corner of the screen; if we click them, we may opt to restart or it just says restart, depending on what version you are running.
We can finally add the integration after restarting. Before the HACS integration appears, you may need to clear your browser cache.
Now, return to settings and select integrations; from here, at the bottom right, select add integration. Now we'll search for HACS and then add it. We must accept each of these requirements, but once we do, it will provide us with a code, which we will copy, and then click the link to activate the integration with GitHub, which is essential since it requires access to all of the add-on libraries on GitHub. Please keep this window open. It will take you to GitHub and ask you to sign in, after which you must enter the code to allow HACS. After you've input your code, you'll see something like this:
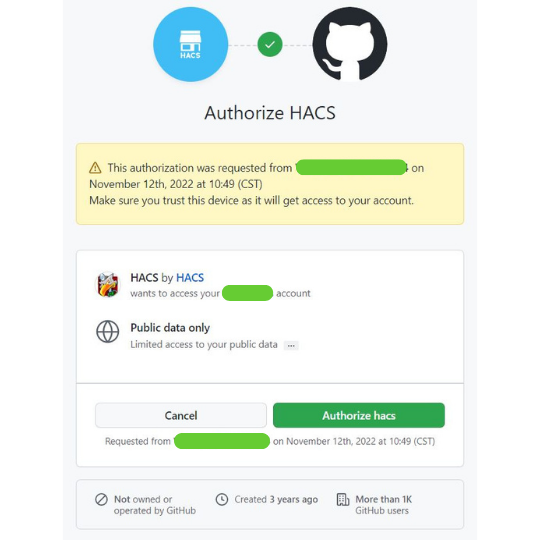
After you click Authorize HACS, another pop-up window will appear in Home Assistant; simply click Finish, and HACS will be installed. If it does not appear on your side bar, clear your cache and restart Home Assistant.
Here's a quick tip: if we go back to our integrations and click the configure button under HACS, we'll get a list of choices to enable if you're running any of these other integrations like "AppDaemon or NetDaemon". Also, HACS can have a significant impact on your instance, therefore make sure to backup your instance on a frequent basis.
Binary Tech Labs
YouTube content creator that provides tech tutorials and reviews on Home Assistant, IoT devices, Raspberry Pi and other Single Board Computers