How To Setup Remote Access For Home Assistant // 4 Methods // Exactly What You Are Looking For!
Learn how to set up secure remote access to your Home Assistant instance using methods like Nabu Casa, DuckDNS, and Cloudflare Argo Tunnel. Improve your smart home experience while keeping security in mind.
In this article, we'll cover everything you need to know about accessing your Home Assistant instance remotely. As with everything else, we'll cover the fundamentals of setting up remote access, as well as some of the security issues to bear in mind. There are various ways to accomplish this; however, in this article, I will focus mostly on two techniques while briefly discussing the others. This one step can significantly improve your Home Assistant experience, and it's quite simple to do.
So if you're ready to get started, read on!
Background
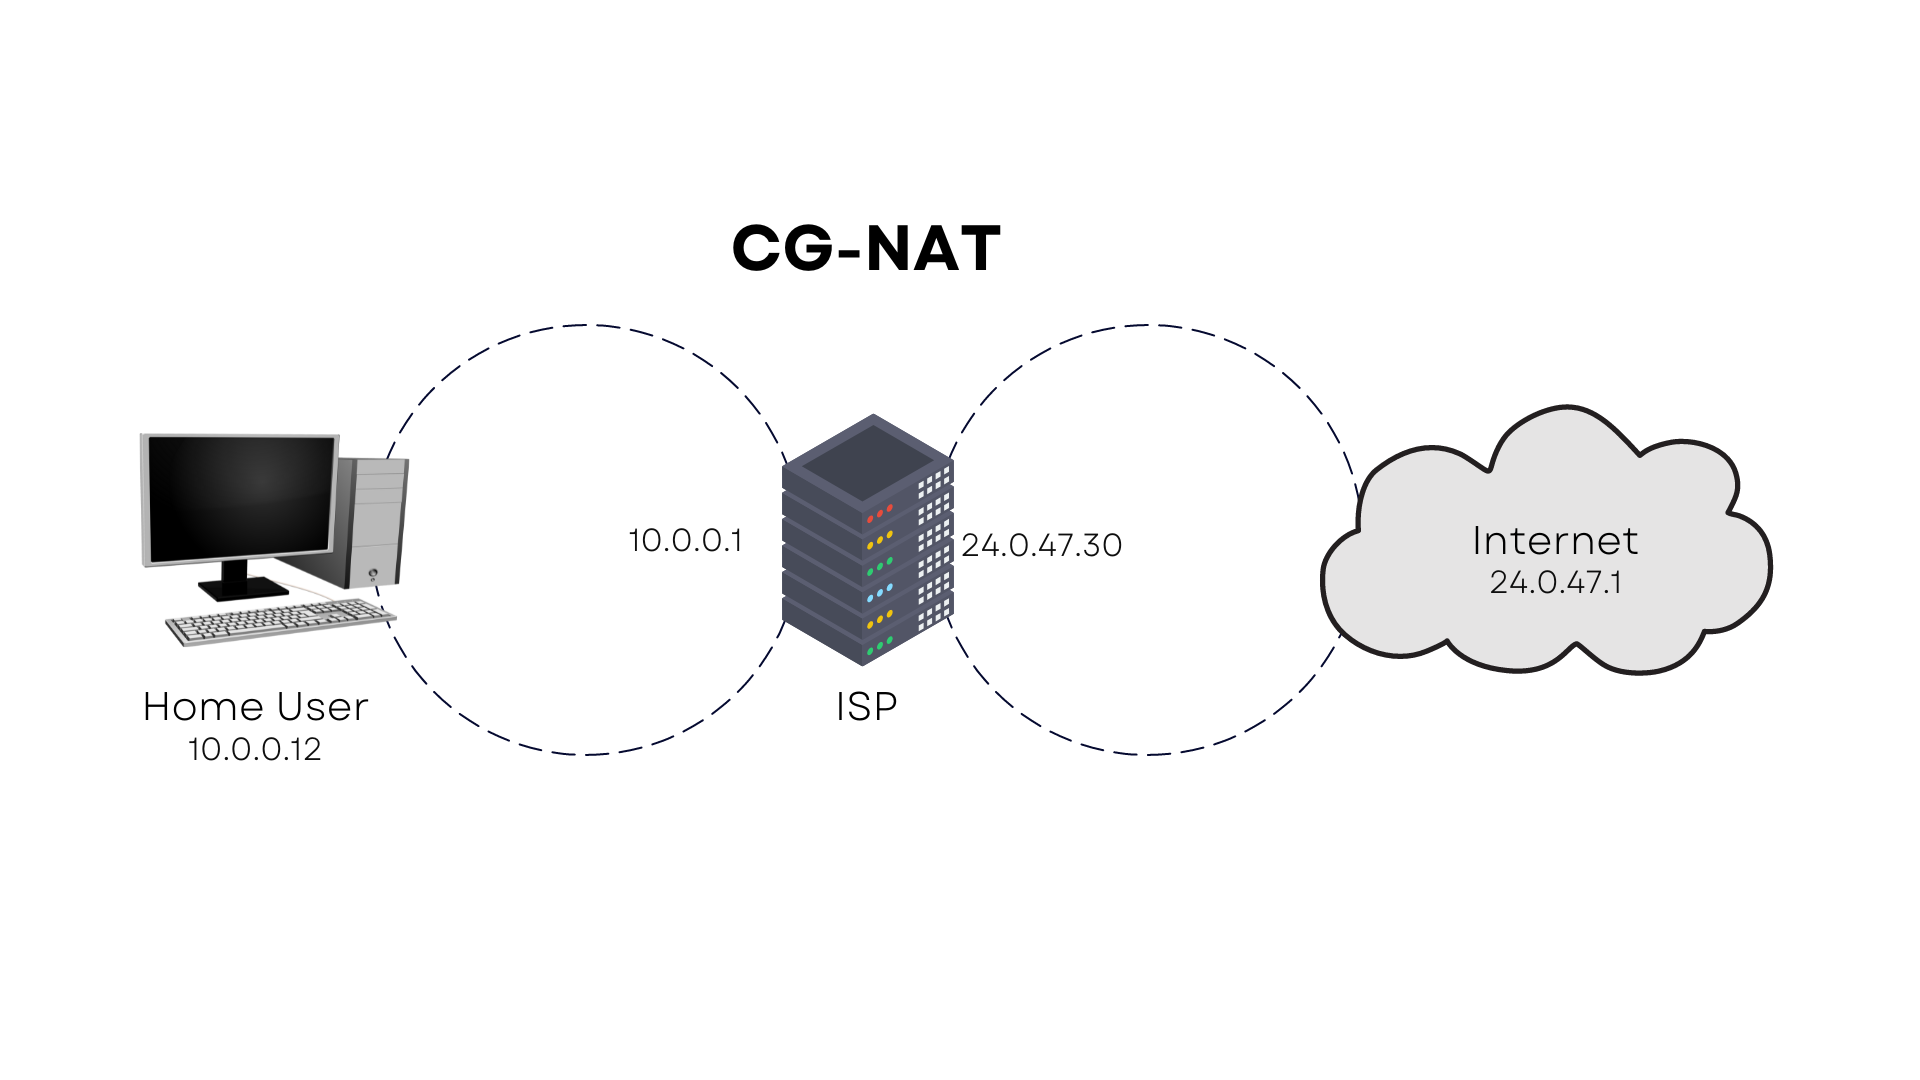
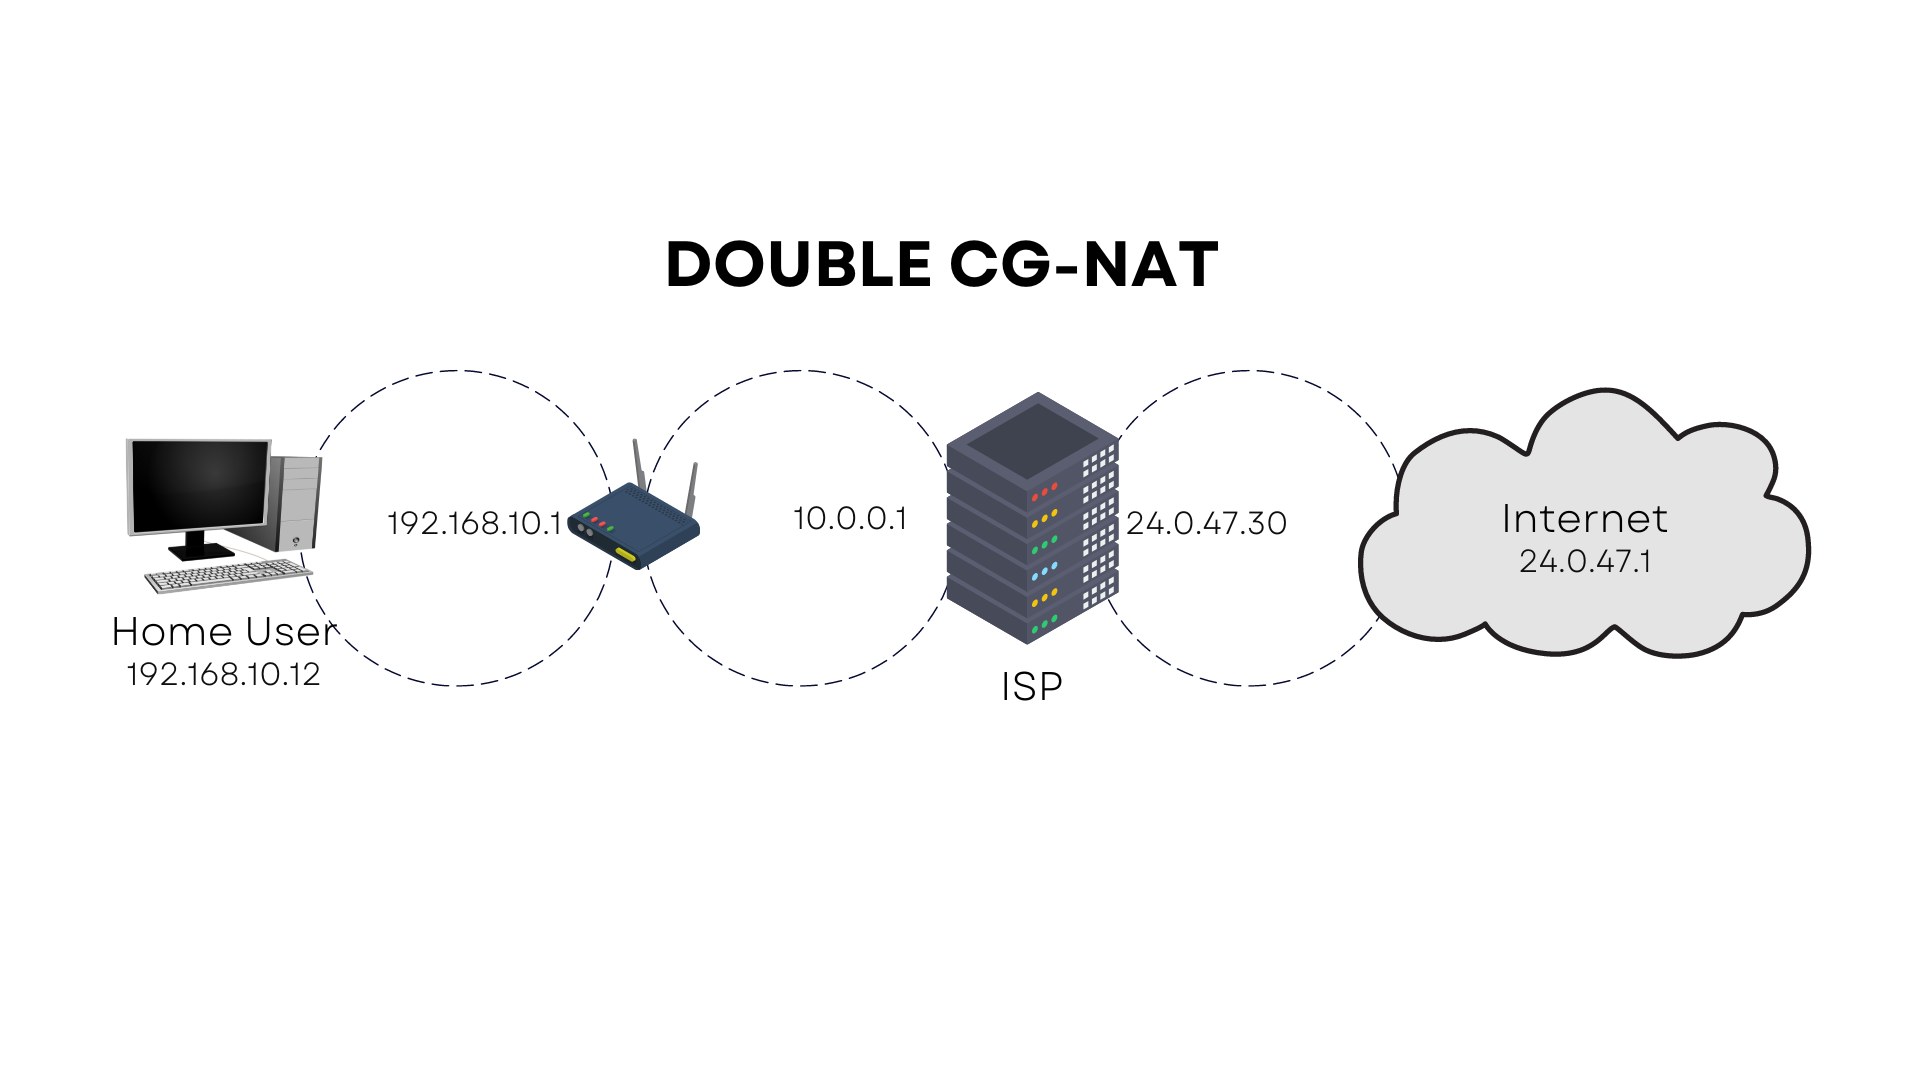
I just wanted to offer you some context since I'm uncertain where you're coming from. To enable remote access, we have two options: the first requires a public-facing IP address and the configuration of port forwarding, a way for making a computer on your network accessible from the internet; the second is a tunnel. Several ISPs employ CG-NAT or double CG-NAT, known as carrier grade network address translation, to mask their clients' IP addresses. This enables them to restrict their public-facing IP addresses and is the most likely obstacle you will face.
Each ISP is different and may or may not permit you to obtain a public-facing IP address, which is required for remote access to your Home Assistant instance. Thanks to tunneling, we will be able to circumvent this restriction and do so in a secure manner.
Okay, before we get into the demos, let's talk about the methods we have available to us and I can't emphasize this enough: you really need to keep security in mind and decide your own comfort level with opening up your network to the public, because a secure home network is essential. Remember, you're opening up your home network to the wonderful people of the internet, and only the nicest, most kind caring folks use the internet, right? They would never exploit vulnerable networks to commit a variety of cybercrimes such as installing malware, data or identity theft, and creating botnets, among countless other activities, right? Wrong, they will and they do, please take security very seriously.
Available Options
Alright, the first method and the easiest to setup is Nabu Casa which comes from the developers of Home Assistant. I would choose this option if I didn’t like to torture myself, well no really, I just like self hosting things myself as a way to learn, but this option does ends up costing more than the other options we have available to us, but you will not have to do any of the mucking around that I will be showing you, plus they have a few extra features included, so there is something to be said for that. This method requires no open ports that I am aware of. This method has no open ports!
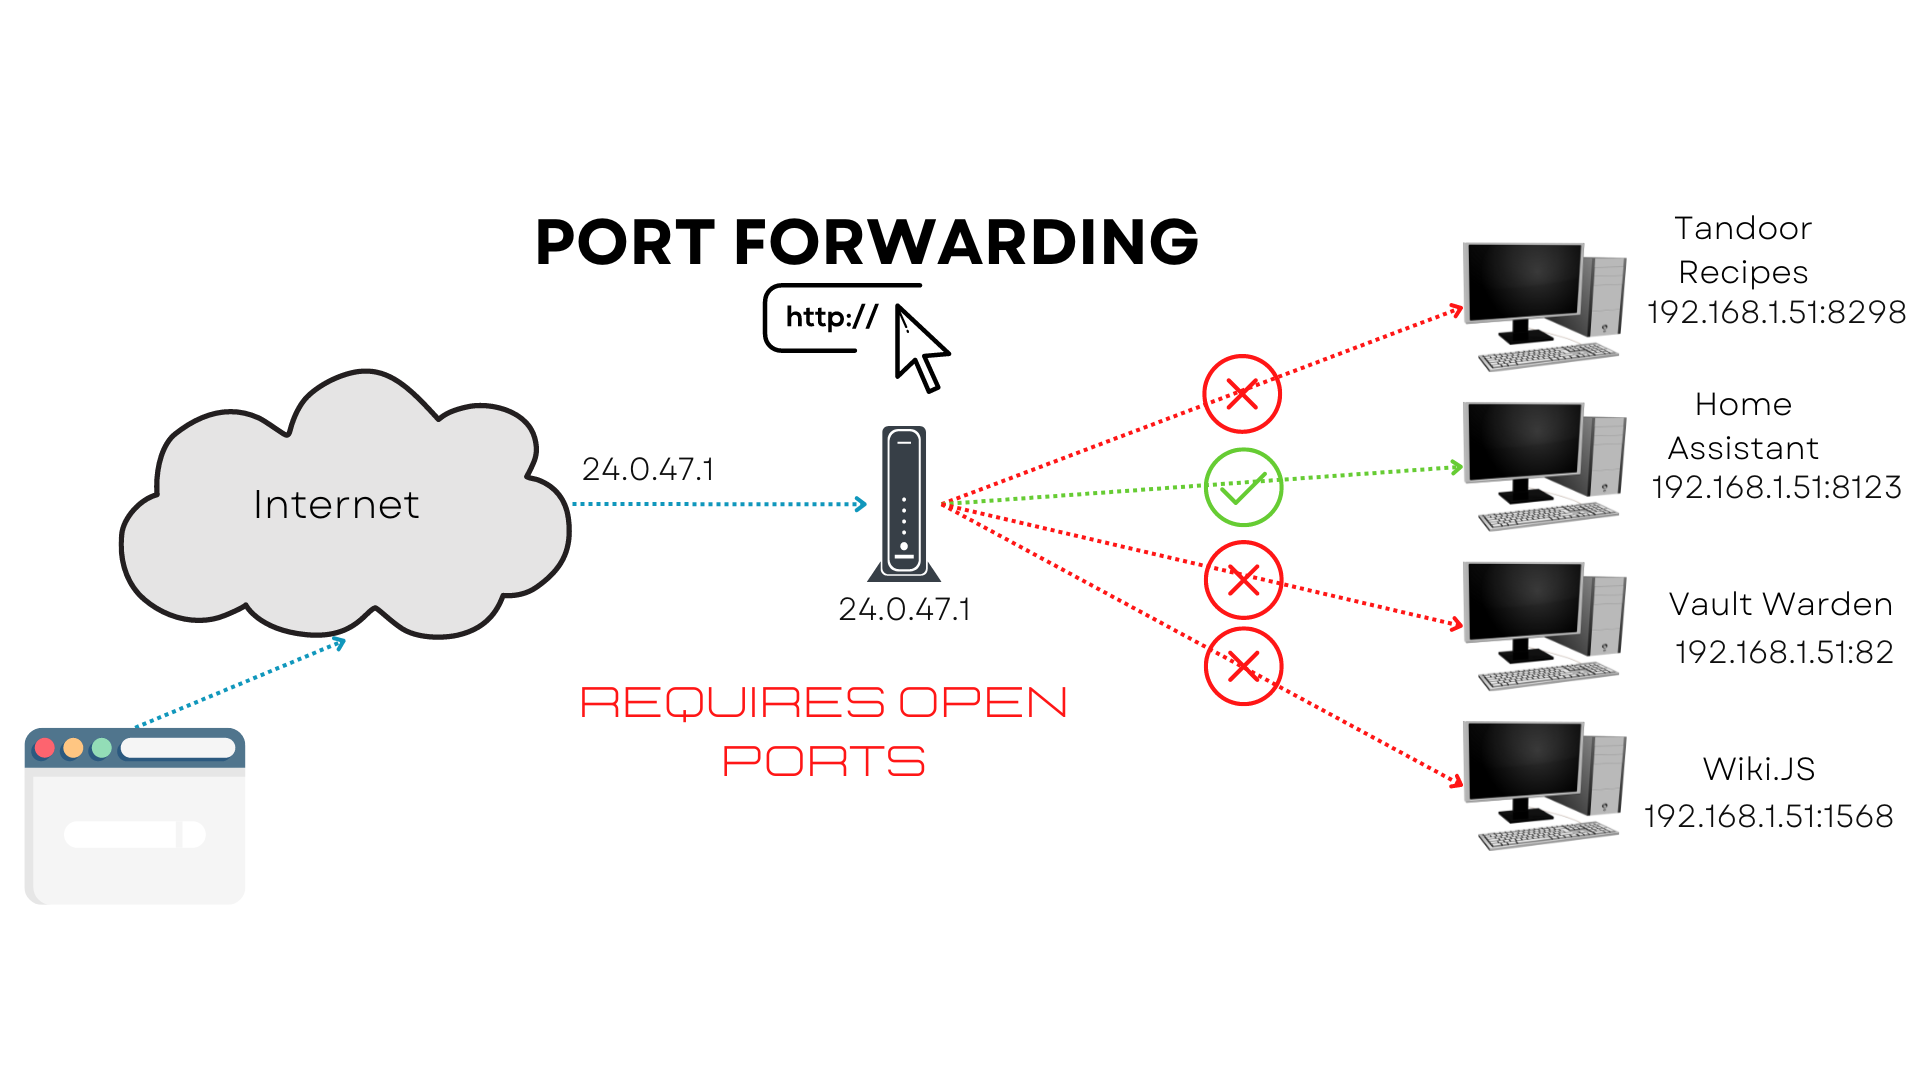
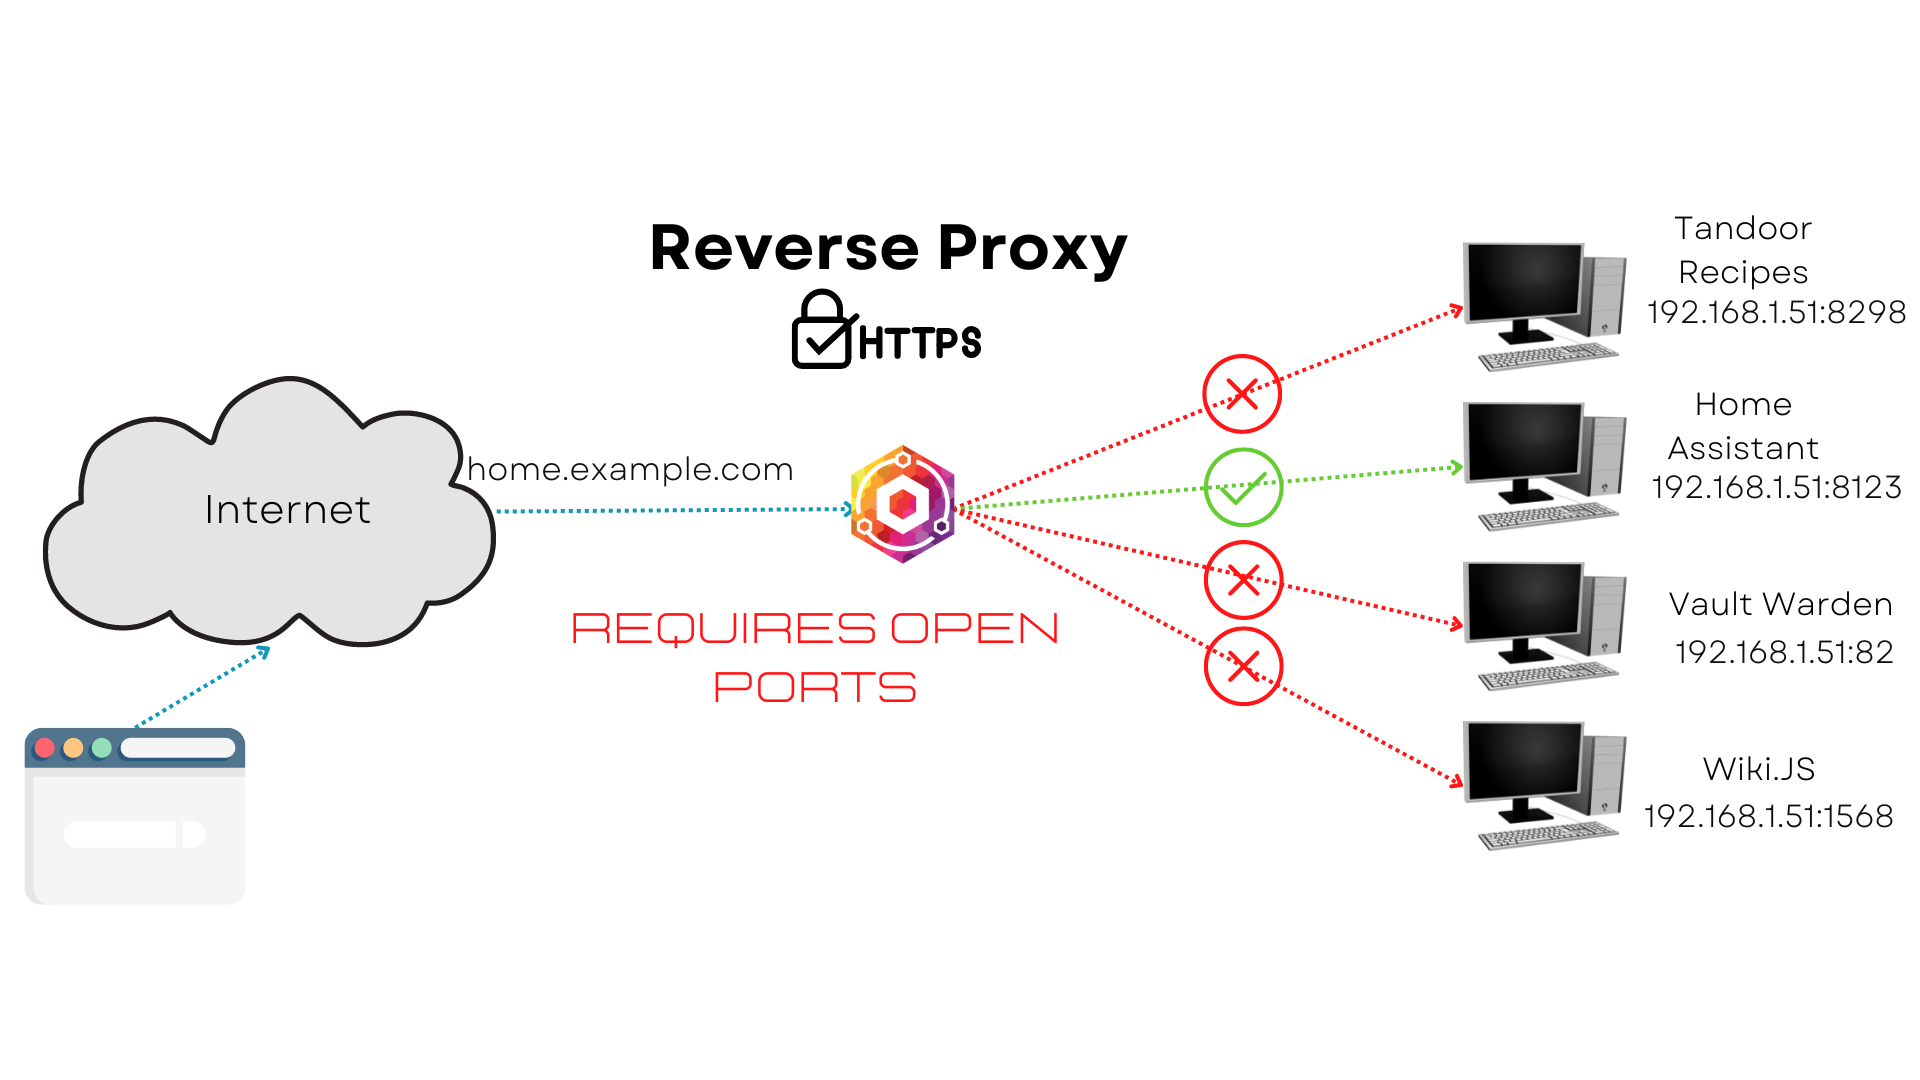
The second method is to use duckDNS with Let's Encrypt, which is a 100% free solution. This method may be used with a purchased domain, and there are numerous guides and YouTube videos available to show you how to do so. DuckDNS is used to point your public IP address to the IP address of your home assistant instance, and it will automatically change your IP for what the free domain (ie. YOUR USER NAME.duckdns.org) points to when your IP address changes, as most likely you have a DHCP IP address unless you have a special use case for paying for a static IP (one that never changes) from your ISP. This method requires open ports!
The third method is to set up a reverse proxy, with a public facing IP address from your ISP, your domain and/or a routing service like duckDNS or Route 53 as well, but the routing services are optional, which again you can find many tutorials on YouTube for. Just know you can use NGINX to accomplish this, but someone has already written a terrific application that does precisely what you want without having to configure NGINX. It's called NGINX Proxy Manager, and it's already included in Home Assistant Add-ons. This method requires open ports!
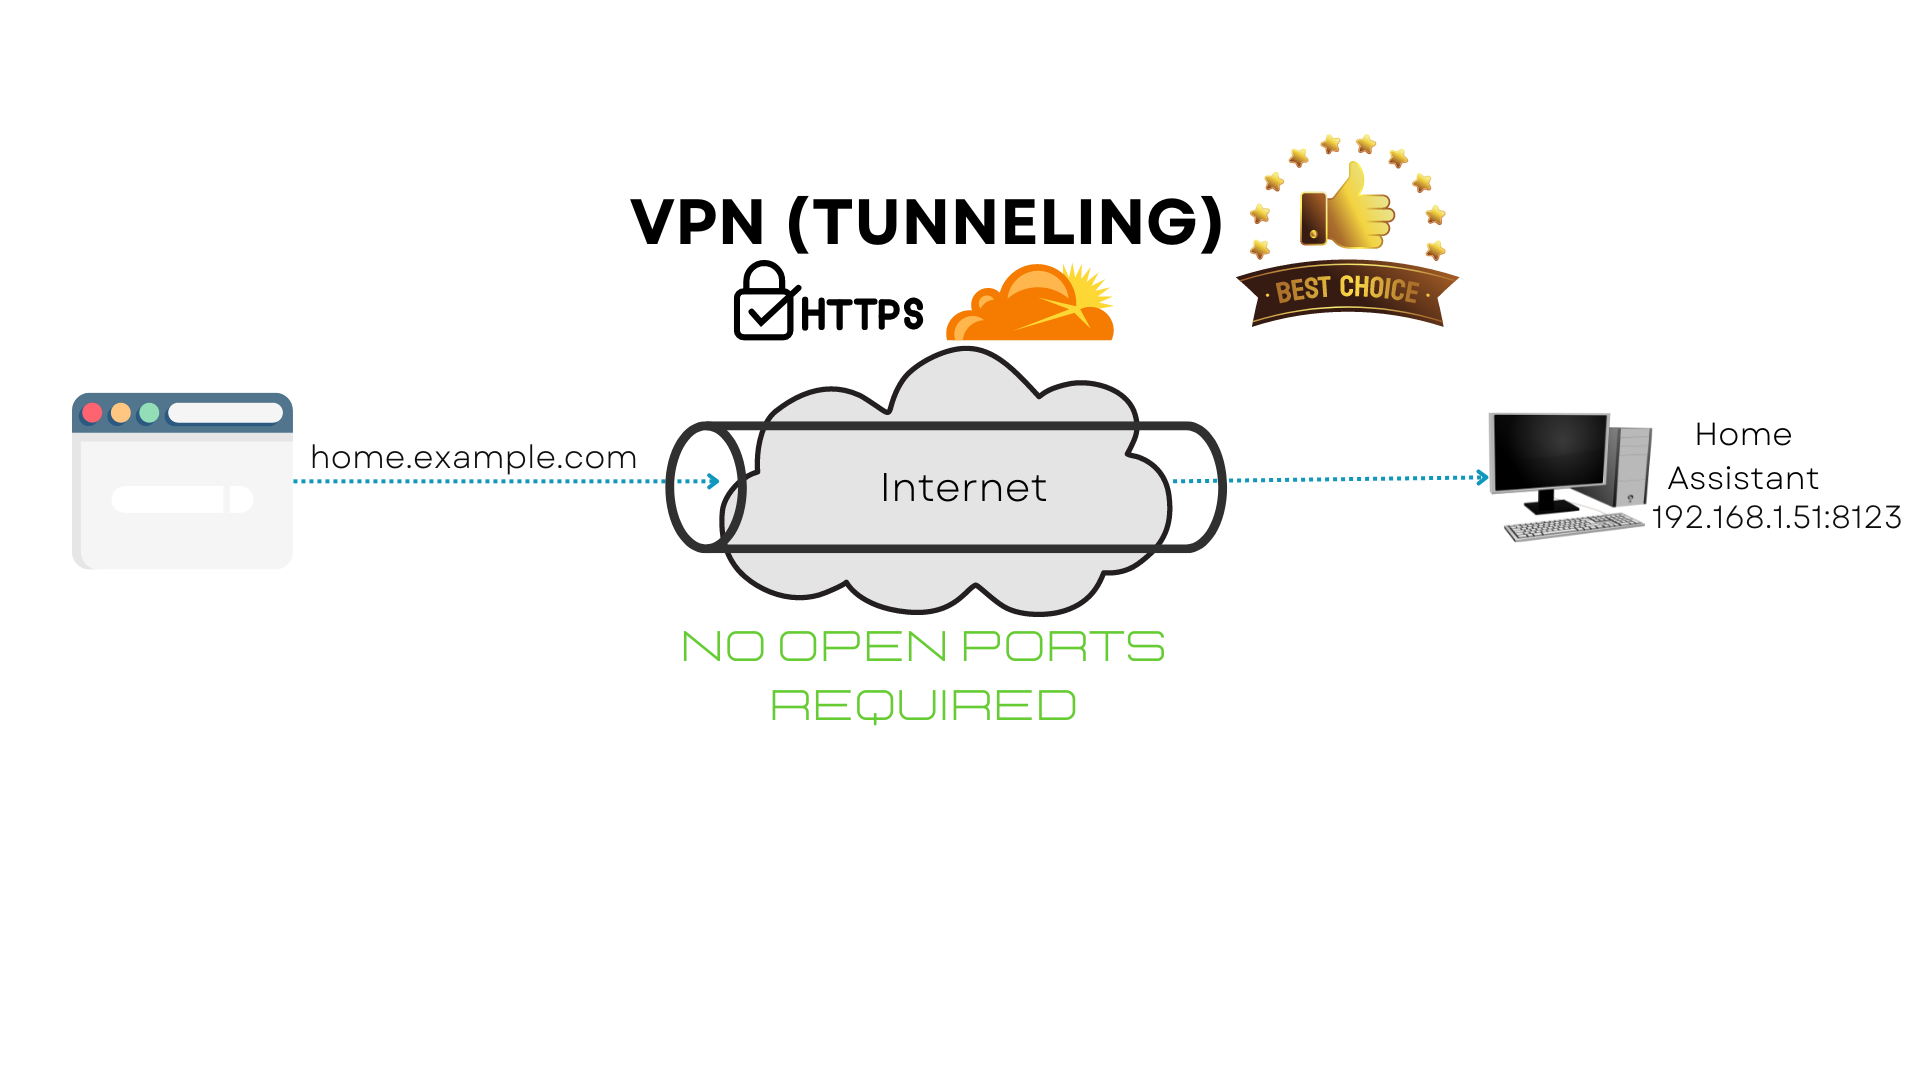
The fourth and final method, which I will show you how to do and which is my recommendation, is setting up a Cloudflare Argo tunnel, very similar to Nabu Casa. In contrast to the other methods, setting up a tunnel will allow you to access your Home Assistant instance without having to open any ports on your router or publicly expose your network. The process for setting up an Argo tunnel is relatively straightforward, and this method is for the folks out there who can’t get a public facing IP address from their ISP, are blocked by a CG-NAT or Double CG-NAT, or just don’t want to deal with the hassle of open ports and routing services like DuckDNS or Route53, however you will require a domain. This method has no open ports!
Requirements
As for the requirements , as I previously stated, you will need to acquire a domain for what I am about to teach and set up a free Cloudflare account; I paid $24.13 CDN for my domain from GoDaddy for a year, and that's all you'll need to pay, so only $2.01 each month, which is $7.82 less than what Nabu Casa charges, So I think it's a worthwhile investment to pay for the domain, and have some fun learning in the process. Now that we have the basics down, it's time to get our hands dirty.
Version Checks
To make sure we're all on the same page, here are the version numbers I was running on my RPi at the time of writing; You can find yours by going to Settings → About

Cloudflare Argo Tunnel
Cloudflare is a DNS provider that offers impressive performance, encryption, and privacy protections for its users. Not only that, but they offer this all for free, and we are going to take advantage of their Argo Tunnel software to encrypt and securely transfer our data to ensure that our Home Assistant instance is safe, no matter where you are hosting it.
We will leverage this secure tunnel to connect our Home Assistant instance, using a great add-on developed by Tobias Brenner. This enables us to connect our Home Assistant instance to the Internet without having to open any ports. You may also use the Cloudflare Zero Trust dashboard to further protect your connection; however, that is discussed in the advanced configuration of this add-on and is not covered in this video, so I recommend reviewing their documentation if you want to pursue this.
As mentioned, you must own a domain, and if you don’t want to buy one, you can follow this article that Tobias produced on how to get a free one. Okay, so getting this up and running is rather simple, but there are a few criteria that must be met first. I've already said that you'll need a domain, but that domain must be within Cloudflare's control. So, if you don’t already have a free Cloudflare account, go ahead and create one now, and then transfer your domain to them. I have linked to an article on how to do this if you’ve chosen to use GoDaddy as your registrar; if you chose someone else, then you will have to search for how to add custom nameservers for your registrar of choice. Once you have completed that, you can check if it is active by going to your Cloudflare dashboard. There should be a green check mark in the section for your domain, but you should have received an email saying the transfer was successful.
Now that we've gotten that out of the way, you'll appreciate how quick this is.
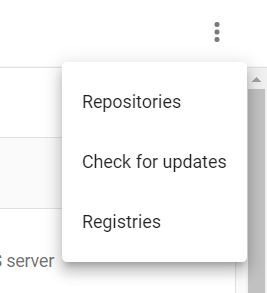
OK, so in Home Assistant we need to navigate to Settings → Add-ons and click on the “Add-On Store” button in the bottom right of the screen. Now on the top right, there are 3 dots, we will click that and select “Repositories”.
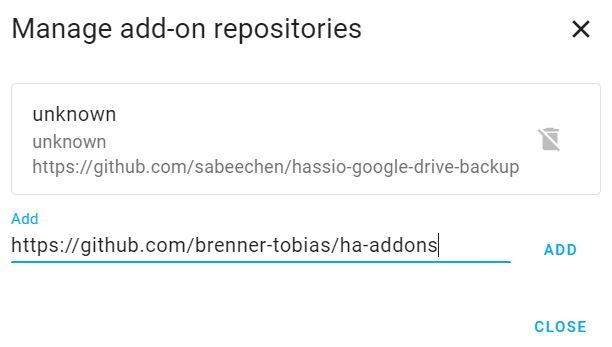
This will bring us to the “Manage add-on repositories” where we will paste in his GitHub repo and click add.
Simply refreshing the page should bring up the add-on, or you may search for Cloudflared, which will also bring it up. Go ahead and click on it and start the install of this add-on.
Once it is installed, we need to add a few lines to our "configuration.yaml" that is going to add some information to our header request. This just tells Home Assistant that we trust this source to access our instance; otherwise, when you try to load Home Assistant, you will get a "400 bad request" error.
http:
  use_x_forwarded_for: true
  trusted_proxies:
    - 172.30.33.0/24
So to further explain what’s happening; This add-on runs locally on our instance, and because Home Assistant prohibits requests from proxies and reverse proxies, we must instruct Home Assistant to trust the Docker network from where these requests are being received. There is no need to modify this code because we are supplying an IP range of our Docker network that is always the same. In essence, we are whitelisting a set of IP addresses for Home Assistant to trust.
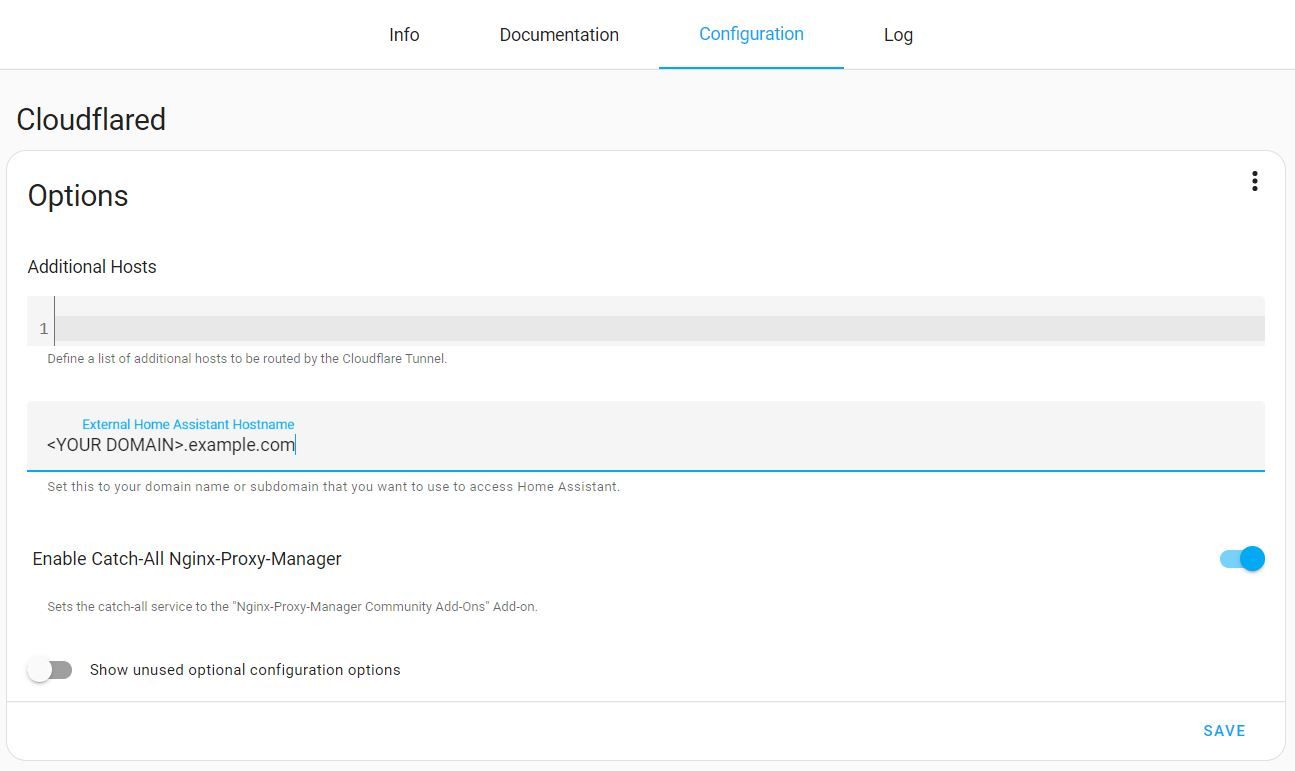
Simply return to the Cloudflared Add-on and select the "Configuration" tab. The only thing we need to do here is enter our external hostname, which may be anything you want: ha.example.com or remote.example.com, replacing of course with your own domain name. You can disregard the "Enable Catch-All Nginx-Proxy-Manager" option that I enabled because I was checking out some other functionality and it is not required for what we are doing.
Now just click save, return to the "Info" tab, and click start. Once it starts up, just click on the "Log" tab now as it will spit out a webpage that we need to copy and navigate to to authorize Cloudflare to create this tunnel, and that’s it; we are all done. You can now navigate to your site with the web address you’ve created, and you will be using the https protocol.
Now you can link your mobile app to this new web address, and you can really start unleashing the power of Home Assistant.
Binary Tech Labs
YouTube content creator that provides tech tutorials and reviews on Home Assistant, IoT devices, Raspberry Pi and other Single Board Computers