Save the Planet (and Your Wallet) with Home Assistant - A DIY Guide To Power Monitoring.
Hey there, and welcome back! In this article, we're diving into the world of power monitoring systems—and trust us, it's a topic worth exploring.
If you're an energy consumer, you know that power costs are always on the rise. But did you know that a properly installed and configured power monitoring system can help you save money on your energy bills and reduce your carbon footprint? It's true! These systems typically consist of multiple metering points that are interconnected for accuracy, and they can help you track and optimize your energy usage.
So, what exactly are power monitoring systems made of? Typically, they consist of three main components:
- A metering device to capture raw data
- Software to collect and display the data
- A communications interface between the software and metering devices
In this video, we'll be breaking down these components in more detail and showing you how they work together to help you save money and reduce your environmental impact. We have a lot of ground to cover, so let's get started!
Methodology
Are you looking to reduce your energy consumption and costs? Do you want to know more about where, when, and how your energy is being used and which loads are consuming it? By gaining this knowledge, you can take steps to lower your energy bills and reduce your carbon footprint each month. However, it's important to keep safety in mind when working with or near energized equipment, especially at the mains level. Qualified electricians should be the ones to install and service this type of equipment, as they are familiar with the potential hazards and how to protect against shock and thermal burns. Don't take unnecessary risks—if you're not trained to handle energized equipment, leave it to the professionals. Trust us, you don't want to end up as a cautionary tale about the hazards of messing with electricity. Your safety is worth it.
Metering Devices
The first component in monitoring and measuring your energy usage, and you have a few different types of devices you can use. Two common options are split-core current transformers (CTs) and solid-core CTs. In this case, I'll be using a split-core CT for a couple of reasons. Firstly, it can be installed without having to remove any mains-level wiring, making it a safer option. Secondly, the model I'm using has a Zener diode that protects against dangerous open circuits on the secondary side of the CT.
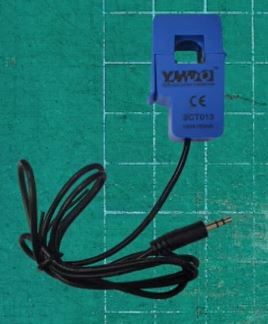
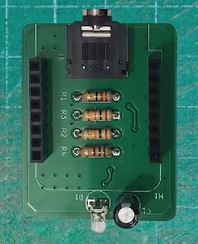
I came across Mottram Labs on GitHub while doing some research on ESP devices, and I'm excited to share with you these handy little daughter boards that Mottram has created for ESP devices. They allow you to easily connect a CT and have all the necessary circuitry for handling measurements, including a burden resistor paired with the D1 mini's 3V3 input logic. Not only has Mottram Labs shared the schematic for you to make your own using KiCad, if you choose, but he's also provided a 3D file for a housing that you can either print yourself or have printed by a service.
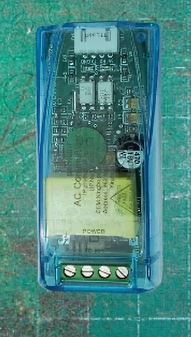
When measuring power, you typically need two inputs: current and voltage. One option for measuring voltage is to use a PZEM-004T Voltage Sensor, which is a voltage transformer that can monitor AC voltage. It's important to note that this device can also measure current without the need for a CT module, but I'm choosing to only use it as my voltage reference in this case. The PZEM-004T can measure AC voltages up to 250 volts, and in this demonstration, I'll be using it, but you can always hard-code a value for the voltage component of the equation.
Software for our Data
For the second component, when it comes to monitoring and analyzing your energy usage, you want to make sure you have the right tools for the job. Luckily, there are plenty of excellent software options available that can help you collect and display data in a meaningful way. One option to consider is Home Assistant, a powerful platform that allows you to bring all of your energy data together in one place. Whether you're looking at real-time data or want to track trends over time, Home Assistant makes it easy to keep an eye on your energy usage. Another option is Grafana, which is a visualization tool that can help you make sense of your data in a more graphical way. While we won't be covering Grafana in this video, it's definitely worth looking into if you want to take your energy monitoring to the next level. If you don't already have Home Assistant installed, it's easy to get set up. Just follow the instructions on the Home Assistant website, or check out some of my other how-to videos for more guidance.
Communications Interface
The last component is connecting your energy monitoring software to your metering devices. For this, you need a solid communications interface—something that can withstand the demands of all that data flying back and forth. That's where ESPHome comes in. This platform is very powerful and makes it easy to program your device and connect it to Home Assistant.
Just open up your web browser and head on over to esphome.io. It's like a one-stop shop for all your energy monitoring needs. You'll find plenty of helpful documentation and sample YAML code to get you started. And the best part? It's so user-friendly, even a caveman could do it (sorry, Geico). So if you're ready to take control of your energy usage and start saving some serious cash, give ESPHome a try. It's the missing piece in your energy monitoring puzzle.
Requirements
Aside from Home Assistant and the ESPHome integration (which really isn't a requirement), we'll need to gather some materials and tools before we can build this. Here's a list of what you'll need:
- CT Clamp
- D1 Mini
- D1 Mini Power Sensor Module
- A 3D Case
- Micro USB Data Cable
- AC/DC Clamp Meter (borrow one if you need to)
- (Optionally) PZEM-004T Voltage Sensor
Version Checks
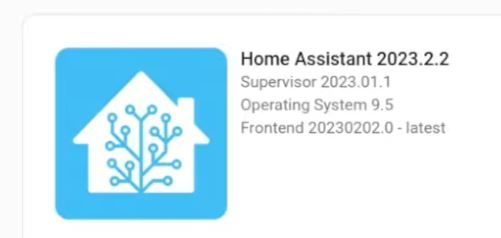
To make sure we're all on the same page, here are is the current version I am running for my Home Assistant Instance at the time of recording; You can find yours by going to Settings → About
For ESPHome, we just need to navigate to Settings → Add-ons → ESPHome, and at the time of recording, the current version I was using was version: 2022.12.8

Programming
Now that you've set up your power monitoring system and are ready to start collecting data, it's time to figure out how to communicate with your devices. There are a few different options to consider, each with their own pros and cons. One option is to use a dedicated communication protocol, such as Zigbee or Z-Wave, which can provide a reliable and secure connection between your devices. Another option is to use a local network protocol, such as WiFi or Ethernet, which allows you to easily connect your devices to your home network.
No matter which method you choose, the key is to find a solution that is reliable, easy to use, and fits your needs. Whether you're a seasoned pro or new to home automation, there are plenty of options available to help you get your power monitoring system up and running smoothly. So don't be afraid to experiment and find the solution that works best for you. With a little bit of trial and error, you'll be well on your way to a fully integrated power monitoring system that helps you save energy and money.
The option I am going to show you is ESPHome and it uses Wifi, in this case. It is a platform that allows you to "program" various devices using a YAML configuration file, even if you're not a programmer. ESPHome takes care of the heavy lifting, and then compiles the actual program into a binary file that you can flash to your device of choice.
To use ESPHome, you'll create a YAML file, also known as a "node," which contains the necessary configurations. There are complex automations and templates available in ESPHome, which allow you to execute actions based on specific criteria or configure your node without using the ESPHome C++ API. Components, which act as building blocks, can be used to construct templates. You can also use substitutions in your templates to alter variables at the beginning of the file, which can save time when working with larger, more complex templates that you plan to reuse for different circuits in your home.
I've provided a link to my GitHub repository, where you'll find the necessary YAML configuration files. My goal is to help you learn how to accomplish these tasks and feel confident in your abilities. In my YAML files, I've included links to the necessary documentation to make troubleshooting easier. If you're using a voltage sensor module to determine your actual voltage level, be sure to use the "ct_sensor_voltage.yaml" file instead of the "ct_sensor.yaml" file.
To get started, copy the text of the appropriate file from my GitHub page and open the ESPHome dashboard. From there, click the "+ New Device" button and go through the wizard. Choose a name that makes sense for your project, such as "fridge-ct-sensor" if you're working on a CT sensor for your fridge. On the next screen, select the "skip this step" option, and it doesn't matter too much which option you choose here if you're running the same version of ESPHome as I am. The important thing is to have the node listed on your dashboard so you can replace everything in the file. On the final screen, you'll see "Configuration created!" Click the skip button again, and you should now see the newly created node on your dashboard.
Keep in mind that you'll need to program your node via USB the first time, but any subsequent updates can be done over the air (OTA).
Integration
Once you've installed your configuration on your ESP device and it's online, it should be easy for Home Assistant to find it and offer to configure it on your integration screen. If you prefer, you can also add the device manually on the Home Assistant Integrations page. Simply click the "Add Integration" button in the bottom right corner, search for ESPHome, and enter the hostname or IP address of your device.
For example, you might enter "<NODE_NAME>.local" as the host, replacing <NODE_NAME> with the name you gave your device (e.g., "fridge-ct-sensor"). Alternatively, you can use the IP address of your device, which you can find in the logs when you first program it.
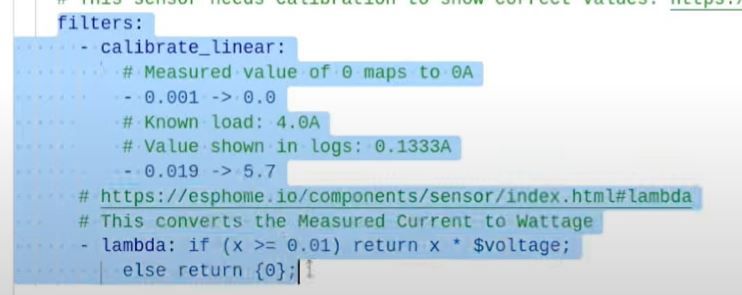
Calibration
Now that our device is integrated with Home Assistant, it's time to calibrate it. To do this, we'll need to make a few changes to the YAML file for our node. First, we'll need to comment out the two calibration lines in the "calibrate linear:" section. This will allow our current sensor to provide unfiltered values.
Next, we'll need an AC/DC clamp meter with a line splitter. You can make your own by using extension cord ends and stripping some wires, or you can ask an electrician to make one for you. The black wire should be connected to the gold or brass terminal, the white wire should be connected to the silver terminal, and the green wire should be connected to the green terminal.
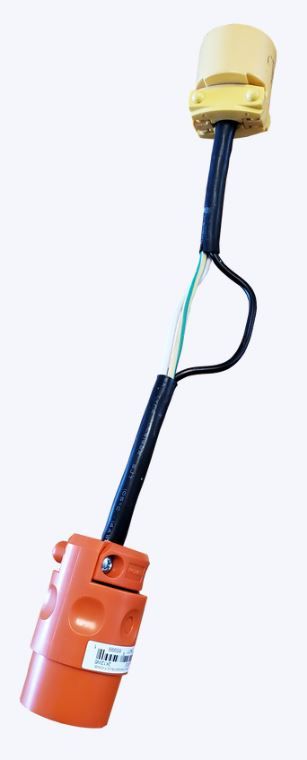
To test our device, we'll need to find something with a steady current draw, such as a lamp. Turn on the lamp after plugging it into the line splitter and the wall outlet, and then clamp the CT sensor around the same wire (the black one).
Now, open Home Assistant and load the CT sensor to see what it's reading. Record this value, and then use the AC/DC clamp meter to record the current reading. Go back to the ESPHome dashboard and uncomment the two calibration lines in the YAML file for the CT sensor node. If you're getting strange readings, try increasing the value to between 0.05 and 0.09 mapped to 0. Then, transfer the raw value that the CT sensor reads to the value that the AC/DC clamp meter reported, and you'll be calibrated.
Once you've finished calibrating your device, you can install it in your electrical panel if that's where you'll be capturing measurements. Turn it on and verify that Home Assistant is receiving readings. You can also add consumption to the energy tab if you'd like.
Conclusion
In conclusion, Home Assistant is a powerful and easy-to-use platform for home automation that can help you save the planet (and your wallet) by monitoring and reducing your energy consumption. With just a few simple steps and a little bit of DIY know-how, you can set up Home Assistant to monitor your power usage and create a more sustainable and energy-efficient home. Thank you for reading this guide, we hope you found it helpful and has encouraged you to give this a try. Let me know how it goes! Happy home automation!
Binary Tech Labs
YouTube content creator that provides tech tutorials and reviews on Home Assistant, IoT devices, Raspberry Pi and other Single Board Computers