Home Assistant & Zigbee: How to Set It Up and Put It to Use, and Why You Should Do the Same! Part 3. ZigBee 3.0 Dongle Plus
In this article, I will be talking about the ZigBee 3 Dongle Plus and how it can help you get the most out of your ZigBee setup. This device is advertised as "pre-flashed," but what does that mean? Does it work right out of the box? Let me explain in more detail why the ZigBee 3 Dongle Plus is such a great option for new ZigBee users.
So let's get started and explore what the ZigBee 3 Dongle Plus has to offer!
Background
The ZigBee Dongle 3 Plus comes in two varieties: ZBDongle-P or ZigBee 3.0 Dongle Plus and ZBDongle-E or ZigBee 3.0 Dongle Plus v2. As the table published by Sonoff shows, there are a few differences here;
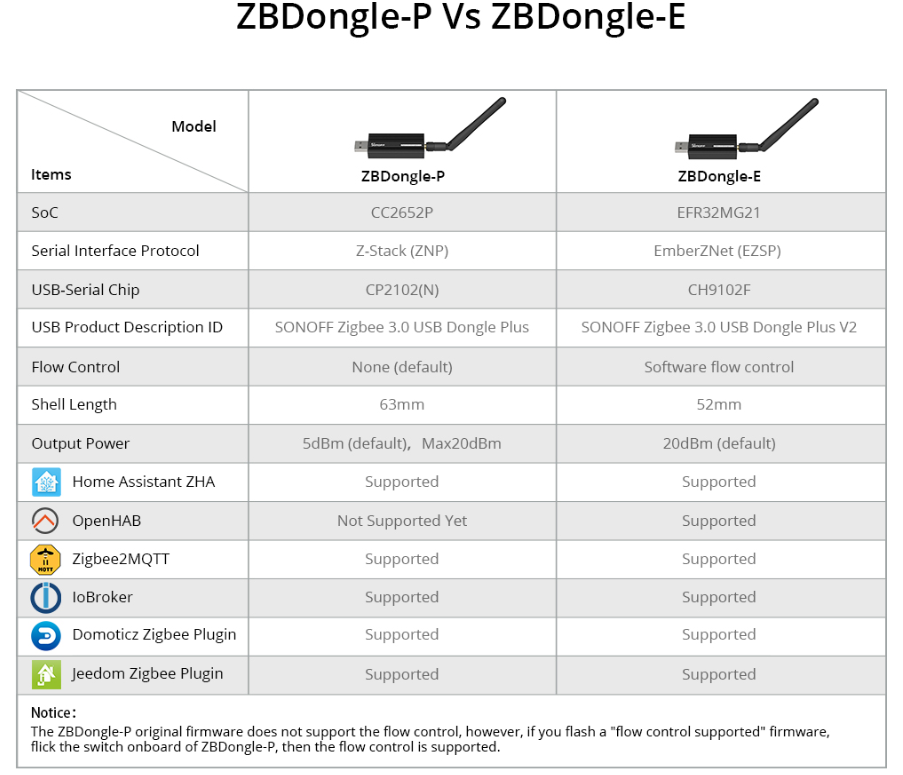
The main point of difference is that they use different chipsets and USB-serial chipsets. Other changes include flow control, serial interface protocol, and output power, but the key here is that the ZBDongle-P supports a broader range of devices. It comes pre-flashed with Z-Stack (ZNP) coordinator firmware out of the box, but this may be changed to router firmware or even OpenThread/Spinel Radio Co-Processor (RCP) firmware, which will enable the Thread network protocol in the future for the forthcoming Matter standard.
A lot of the information you'll read online talks about updating the firmware of your device, but you might not need to. People used to do this because some older devices had known firmware bugs, and updating was critical. It's more the case now, that when a device is shipped, it is more likely that there have been new firmware upgrades since it was first installed.
So, basically, yes, the device will work out of the box in either Home Assistant or Zigbee2MQTT, and you should have no problems with it, but if you can't tell what version of firmware is installed, it is a good idea to flash it with the most recent version of firmware to ensure you are up to date, have all the latest features, and the security patches are applied to your device.
With that stated, and in my opinion, given the greater range of compatible devices, the ZBDongle-P is the ideal choice of hardware for your needs.
Requirements
So, with that in mind, let's first go over the requirements for this setup, which are very minimal. You will need Home Assistant, a ZigBee device, a USB extension cable and the ZigBee 3 Dongle Plus, that’s it.
Version Check
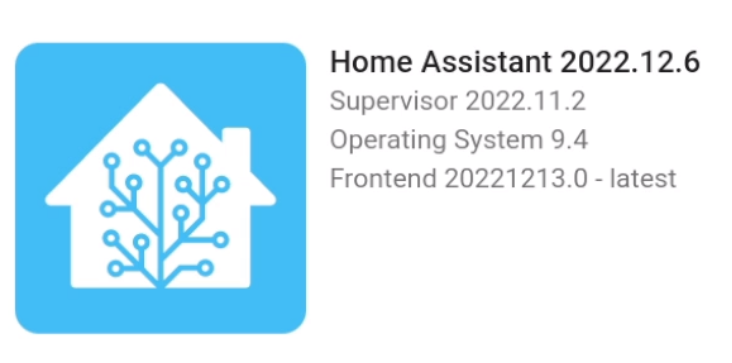
To make sure we're all on the same page, here are the version numbers I was running on my RPi at the time of writing this article; You can find yours by going to Settings → About.
Flashing Methods
If you want to update your device with the latest firmware or convert it to router firmware, Sonoff has supplied a tutorial to make the process pretty straightforward. We have two methods: one is using Python, which eliminates the need to disassemble the device and complete everything through software, and method 2, which involves removing two screws, holding down a button while plugging it into the computer or USB extension cable to make it easier, and then using flashing software to upgrade the firmware.
I recommend the USB extension cable for two reasons: one, it makes it much easier to plug your Sonoff device into your computer (at least mine), and two, it can be used to get the radio far away from your Home Assistance instance, reducing interference with your other electronics, such as your Bluetooth and WiFi antennas.
Coordinator Info
I'm going to start with method 2, and the first thing we have to do if you've attached your antenna is remove it, followed by removing two screws on the end of the device and gently pulling the board out.
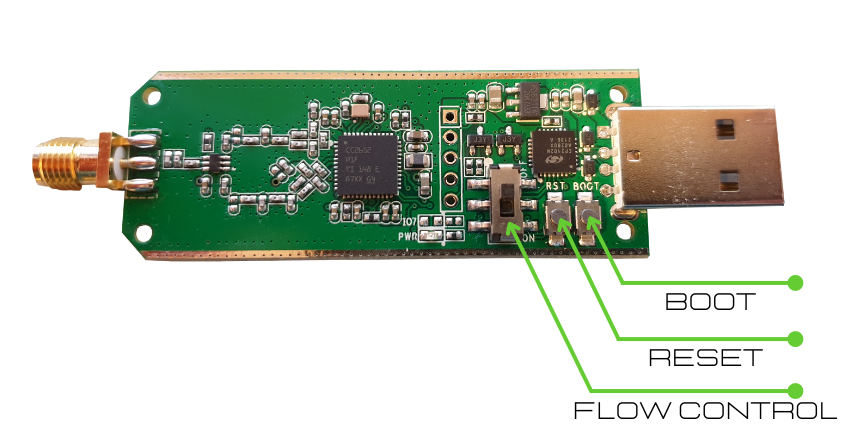
Okay, so you may have noticed or wondered, but the lovely aluminum enclosure isn't a heat sink; it's there to keep other signals from interfering with the dongle. On the board, there are two buttons: reset, boot or BSL and a switch for hardware flow control programming; if you decide to create a firmware that enables this, flipping this switch allows you to program that separate firmware.
Flashing
These steps are exactly the same whether you are flashing router or coordinator firmware onto the dongle, so decide what you are flashing and download it. In this article I am using coordinator firmware so that is what I will download. Head over to the GitHub links "router or coordinator" above, and grab the file called “CC1352P2_CC2652P_launchpad_*.zip” which is in the list of tested adapters, the router file follows the same naming convention, if you are going that route.
Okay, so you may have noticed or wondered, but the lovely aluminum enclosure isn't a heat sink; it's there to keep other signals from interfering with the dongle. On the board, there are two buttons: reset and boot. This switch is also for hardware flow control; if you decide to compile a firmware that enables this, flipping this switch allows you to use that firmware. As you see in the guide that would require you to install and use a program called Code Composer Studio or as they are calling it CCS to compile some new firmware, which is going to be out of scope for this video. Additionally, we can see the USB to serial chip and the CC2652P chip used on this board.
There are many tutorials out there that detail how to use the SmartRF Flash Programmer v2 from Texas Instruments. Unfortunately, you require Windows to use it, and as such, those of us who are either Linux or Mac users are left out of the loop; however, they do provide us with a tool called Uniflash.
Now the libraries they use are a little dated, and trying to get it to work with my current Linux deployment would require me to install a downgraded version of Python and some outdated libraries, which I am not going to do just to have a GUI to flash my device, as I am more than comfortable on the command line. As I always say, there is usually more than one way to accomplish something, so I began to search for alternatives and eventually stumbled upon the ZigStar Multi Tool project, which provides an open-source and cross-platform method to program our dongle; however, I was not able to get it working on my machine, and it's been a minute since the project was last updated. Besides looking at the software, it is just a GUI wrapper for the terminal commands I am about to show you, but I just wanted to share these additional options if you really want a GUI to do this.
Thus, in the end, I decided that since I was more comfortable with just using the command line to flash my device, I didn’t want to go through all the trouble of trying to make outdated tools or libraries work with my current system.
So that left me with Python.
Python Flash
So you don't want to disassemble your device and would rather accomplish this with Python. We have a few possibilities here: install Python and the necessary dependencies on your computer, create a virtual machine and install everything there if you don't want to install on your main computer, or use docker.
I'll only teach you how to perform this from your main computer, but I'll here is a link to a docker-compose file if you wish to use it. Ok, on with the show as they say. Let’s jump into the terminal and if you don't already have Python installed, you'll need it; simply do a google search for how to install it on your operating system, or use this link; I'm not going to cover that here. So, now that Python is installed, let's double-check that it's the right version, since we require version 3.0 or higher, and if your version is less than 3.4, you'll also need to install pip, as that's how we'll install our dependencies. To find out, use the following command, (but you may need to use python3):
python --versionNow that we know our version is good, let's grab a few dependencies with this command:
sudo pip3 install pyserial intelhexWe require the JelmerT/cc2538-bsl python script, which we can get from his repository or clone using git from the terminal; the python script must be in the same folder as your firmware HEX file. You must also know what COM port your dongle is connected to. Use the following commands to find out:
In Linux;
ls -l /dev/serial/by-idIn MacOS;
ls /dev/tty.* In Windows;
$comports = Get-WMIObject Win32_SerialPort; $comports | Get-PnpDeviceProperty -InstanceId {$_.pnpdeviceid} -Keyname DEVPKEY_Device_BusReportedDeviceDesc | ForEach-Object { foreach($comport in $comports) { if ($comport.pnpdeviceid -eq $_.instanceid) { new-object psobject -property @{COMPORT = $comport.deviceid; 'Device-Name' = $_.data} } } }For me on Linux, the by ID doesn’t work, so I just use:
ls /dev/tty*Now that we know our COM port we can use the Python file to flash our dongle, just change out the <COM_PORT> to your actual COM port and the <FIRMWARE_HEX> to the actual firmware you downloaded;
python cc2538-bsl.py -p <COM_PORT> -evw --bootloader-sonoff-usb <FIRMWARE_HEX>Remember you may need to use Python3 as before, and let me explain the flags we're using. The dash p stands for the port we're using, the dash "evw" stands for "erase, verify, and write," and the dash bootloader sonoff usb means we're invoking a software toggle to activate the bootloader, allowing us to avoid opening the device.
When you're ready, press enter to begin the flash; as long as you've selected the correct port and have the correct firmware, you should be fine. As previously stated, if you use an incorrect firmware here, you will lock the device and require a Jtag to restore it.
Integrating into Home Assistant
Moving on to Home Assistant integration, we can now plug the dongle into your instance. As previously said, we must know the COM port in order to configure the dongle. You can use the terminal add-on and run the commands for Linux, or one trick I like to use is to go to Settings → System → Hardware → then in the 3 dots in the upper right corner select "All Hardware." This will give us a list and we can filter it down by using what we know the device is, and we saw it was a silicon labs device, so if we just enter silicon, our device will be filtered out. When we pick it, it will display the port it is using. Another method is to examine the Home Assistant logs. If you load the logs by going to Settings → System → Logs, your device should appear, if it does not; simply unplug it and plug it back in to see it. Home Assistant may even know that serial port the radio is running on and you will see when we add the ZHA integration.
To add it, we are going to head over to Settings → Devices & Services and then click the “Add integration” button in the bottom right and search for “ZHA” and click on it, then in the next box, select your serial port that the device is connected to, or you may have to add it manually if you don’t see it in the list and use the serial path we found before. Finally we can set the port speed to "115200" and we’ll have to leave the data flow control blank, as noted in the very top chart, the Dongle Plus has no flow control and then click submit and you should receive a notification confirming that Home Assistant successfully added the new device.
Pairing Devices
We need our coordinator to look for devices to pair in order to add them to your network. This can be accomplished in a variety of ways, including calling the "zha.permit" service in the developer tools, or creating an automation that calls this service via a switch on your dashboard, or navigating to the ZHA integration from "Devices & Services" and selecting configure, then clicking the "Add device" button in the bottom-right corner. Follow the instructions for your ZigBee device to put it into pairing mode, and it should now begin the negotiation process with your coordinator.
Alright, I was going to leave this ZigBee series at the three articles, but I wanted to do a follow up article where I explain how my final mesh network is configured. In the final article, I plan to discuss the hardware components I’ve used and the steps I took to create a reliable mesh network.
Now you see how you can add your zigbee devices now, so have fun pairing!